Physical Exhibits
Handling and Displaying Artifacts
Introduction
This guide is a collection of resources to give you inspiration and help you get started on creating a physical exhibit.
Please Note: Exhibit practices and technology are constantly changing. This guide is meant to be a starting point, not a definitive authority.
Ideas and Curation
Basics
- There is no right or wrong way to create an exhibit, as long as you are respectful towards your audience and the people whose stories you are telling.
- Ask yourself:
- Who is your audience?
- What story do you want to tell?
- What experience do you want visitors to your exhibit to have?
- Are there experts or community members you can ask to be part of the development process to ensure your exhibit is sensitive to the communities it represents?
- It may help to develop a concrete focus and central theme for your exhibit.
- You may also further divide this central theme into sub-themes.
- See this Worksheet on Planning an Exhibit for help with brainstorming.
- Try looking up pictures of other exhibits on similar topics for inspiration.
- Standards for Museum Exhibitions and Indicators of Excellence [2012 Standards for Museum Exhibitions and Indicators of Excellence.pdf]
- The Museum on Mainstreet Exhibition Planning Guide [https://www.humanitieskansas.org/doccenter/d4281f922ff0454b8167ff0cead77fec] provides an excellent introduction to planning and thinking through an exhibit.
- This Curatorial Toolkit [https://visualarts.net.au/media/uploads/files/Curatorial_Toolkit.pdf] is designed for art curators, but also provides a useful introduction on curating exhibits in general.
Text and Labels
- Make your text readable for a general audience.
- Have a variety of people with different backgrounds, levels of education, etc. look over your text and captions.
- Use Hemingway Editor [https://hemingwayapp.com/] to test readability. Aim for around a grade 7 or 8 reading level.
- Please Note: This program may increase your reading level based on place names or the repeated use of some words. Oftentimes you will need to balance the flow of the text with the overall reading level score to create text that is enjoyable to read. While the reading level score is important for ensuring your text is understable to a wide range of individuals, it is a guideline and you may need to have a higher grade reading level (9 or 10) so that the text reflects your intent for the exhibit.
- Think carefully about your choice of words and how it may affect others.
- Always refer to others using the words they prefer.
- Do not be afraid to do a bit of research to find the most respectful and up-to-date ways of referring to people and groups.
- Be mindful of Colonialism when talking about Canada’s history.
- See this Disability Language Style Guide [https://ncdj.org/style-guide/] (also available in Italian) for guidance on writing about disability and people with disabilities.
Resources
- Brief Introduction and Guide to Writing Museum Labels [https://exhibits.si.edu/wp-content/uploads/2017/09/guidelinesforlabelWriters_8.29.pdf]
- Guide to Writing for Museum Exhibits [https://museum.bc.ca/wp-content/uploads/2020/12/BCMA-Exhibit-Dev-The-Art-of-Writing-110.pdf]
- Guide to Designing Exhibit Panels [https://museum.bc.ca/wp-content/uploads/2021/01/BCMA-Exhibit-Dev-Exhibit-Panels-125.pdf]
- Handbook on Accessible Graphic Design [https://www.rgd.ca/database/files/library/RGD_AccessAbility2_Handbook_2021_09_28.pdf]
- https://www.humanitieskansas.org/doccenter/d4281f922ff0454b8167ff0cead77fec
Construction and Design
- Consider what materials will be necessary to properly display your chosen artifacts.
- See this Guide to Choosing a Display Case [https://www.museumsgalleriesscotland.org.uk/advice-article/choosing-new-display-cases/].
- Use this Starting Guide on Lighting [https://mgnsw.org.au/wp-content/uploads/2019/01/Lighting.pdf] to explore your options.
- Do not assume visitors will automatically navigate through your exhibit the way you intend them to.
- If your exhibit’s story needs to be told in a particular order, make sure the exhibit’s layout clearly guides visitors to view it in that order.
- Ensure your exhibit is designed to be accessible to everyone, including people with disabilities.
- Read the Smithsonian Guidelines for Accessible Exhibition Design [https://www.sifacilities.si.edu/sites/default/files/Files/Accessibility/accessible-exhibition-design1.pdf] for an example of considerations for making an accessible physical exhibit.
- Take proper security measures, and incorporate security into your exhibit design.
- See this Museum Security factsheet [https://mgnsw.org.au/sector/resources/online-resources/risk-management/museum-security-fact-sheet/].
- See this Webinar on Museum Security Fundamentals [https://connectingtocollections.org/security_fandamentals/].
Feature Examples
- Below are some examples of features beyond just artifacts and labels that can be used in physical exhibits.
- Videos: These can be played on small screens or projected on walls. Small watching stations which allow visitors to sit down and/or use headphones can also be created for longer videos.

Video of Alabama residents reciting Walt Whitman poems in the Whitman, Alabama exhibit. Source: https://whyy.org/articles/in-whitman-alabama-the-bard-from-long-island-goes-down-south/
The Philadelphia Museum of Art’s exhibit Whitman, Alabama [https://philamuseum.org/calendar/exhibition/whitman-alabama] featured a film projected on the gallery wall. The film showed people from Alabama reciting lines from Walt Whitman poems.
- Flip Up or Sliding Panels: These allow visitors to interact with an exhibit by lifting up or sliding a panel to reveal more information beneath it.
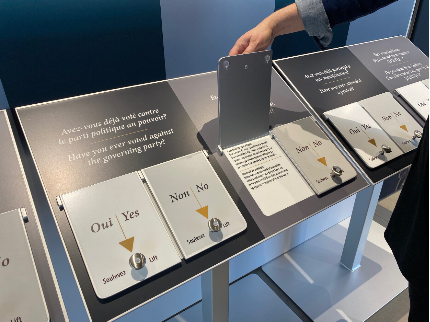
Flip Up Panels in Refuge Canada Mini traveling exhibit by Grant Murray for the Canadian Immigration Museum. Source: https://www.grantmurraydesign.ca/netukulimk-gallery-renewal-1
The Refuge Canada Mini traveling exhibit [https://www.grantmurraydesign.ca/netukulimk-gallery-renewal-1] by Grant Murray and the Canadian Immigration Museum featured Flip Up panels that engaged visitors by asking them questions and having them lift up panels to reveal the answers.
- Visitor Opinions and Stories: Exhibits can include interactive elements for visitors by allowing them to share their opinions by, for example, writing them on sticky notes or a chalkboard or voting on a question.
Visitor’s opinions written on sticky notes and posted on the wall at the 30 Americans exhibit. Source: https://blog.mam.org/2013/10/15/recap-30-americans-sticky-notes/
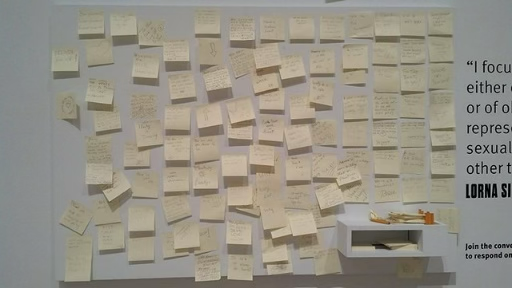
The 30 Americans exhibit [https://mam.org/exhibitions/details/30-americans/] at theMilwaukee Art Museum allowed visitors to write their responses to the exhibit’s artwork on sticky notes and post them on the wall.
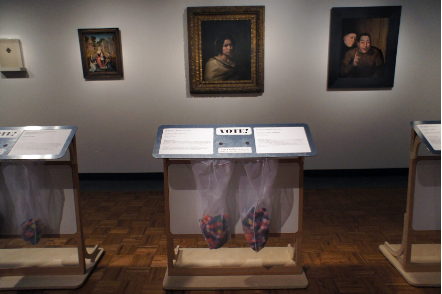
Visitors vote on exhibit labels with pom poms in the Hidden Treasures: An Experiment exhibit. Source: https://flutterwow.com/portfolio/hidden-treasures-experiment-museum-visitors-vote-exhibit-interpretation/
The exhibit Hidden Treasures: An Experiment [https://flutterwow.com/portfolio/hidden-treasures-experiment-museum-visitors-vote-exhibit-interpretation/] at the Detroit Institute of Art had visitors use small pom poms to vote on which painting label they preferred.
- Get Creative! These are just a few of the features physical exhibits can use to engage audiences and tell their stories. Don’t be afraid to think outside the box.
Handling and Displaying Artifacts
- Proper handling of artifacts is incredibly important.
- Do not just pick up and move artifacts without proper consideration.
- See this Video on Handling Objects [https://manual.museum.wa.gov.au/handling-objects].
- See this Tipsheet on Handling Museum Objects [https://www.gov.mb.ca/chc/hrb/pdf/handling_museum_objects.pdf].
- Conservation does not stop during exhibits!
- Ensure you display artifacts in a way that minimizes the chance of potential damage.
- See this Guide to Displaying Objects According to Conservation Guidelines [https://www.saskmuseums.org/wp-content/uploads/2023/02/Conservation_Exhibits-Final.pdf]
- See this Factsheet of Suitable and Unsuitable Materials for Storing and Displaying Artifacts [https://mgnsw.org.au/wp-content/uploads/2019/01/Fact_sheet_stoarge_and_display_-_suitable_and_unsuitable_materials_updated_29.7.pdf]
- Follow the resources below to properly pack and ship artifacts, if necessary.
- See this Webinar on Techniques and Materials for Artifact Packing and Transport [https://www.youtube.com/watch?v=fhbVzvUy9oM].
- See this Guide to Packing and Shipping Paper Artifacts [https://www.nedcc.org/free-resources/preservation-leaflets/4.-storage-and-handling/4.5-packing-and-shipping-paper-artifacts].
Additional Resources
- Creating a Small Exhibition Video [https://www.youtube.com/watch?v=2YviD1Pcq9Y]
- Creating an Exhibit Guide [https://vermonthistory.org/client_media/files/Discover/VHS-Exhibit-Worksheets.pdf]
- Exhibition Planning Guide [https://www.humanitieskansas.org/doccenter/d4281f922ff0454b8167ff0cead77fec]
- A Sustainable Development Guide for Canada’s Museums: Exhibition Materials [https://museums.ca/document/1144/Chapter_4.pdf]
- Light Levels for Exhibition Webinar [https://www.youtube.com/watch?v=3RoBRrr60yo]
- Using Projectors in a Gallery Space Fact Sheet [https://mgnsw.org.au/wp-content/uploads/2018/11/fact_sheet_using_projectors_in_the_gallery.pdf]
- Travelling Exhibition: Initial Planning to Evaluation Tipsheet [https://saskmuseums.org/wp-content/uploads/2023/07/Tip_Sheet-Travelling_Exhibit_Plan_2023.pdf]
- Travelling Exhibition: Handling, Packing, and Crating for Tour Tipsheet [https://saskmuseums.org/wp-content/uploads/2023/07/Tip_Sheet-Handling_Packing_Crating_2023-.pdf]
- Creating Accessible Museums Tipsheet [https://saskmuseums.org/wp-content/uploads/2023/02/Creating_Accessible_Museums-Final.pdf]
- Planning the Affordable Museum Exhibit: 9 Tips [https://museumenvironments.com/planning-the-affordable-museum-exhibit-9-tips/]
Books
Hughes, Philip. Exhibition Design
Serrell, Beverly. Exhibit Labels
Museum Suppliers
- Carr McLean [https://www.carrmclean.ca/]
- Gaylord Archival [https://www.gaylord.com/]
- Uline [https://www.uline.ca]


 Carrie-Ann Smith est titulaire d’une maîtrise en bibliothéconomie et sciences de l’information de l’Université Dalhousie à Halifax. Elle est devenue membre de la Pier 21 Society à l’été 1998 et occupe actuellement le poste de Device-President, Public Engagement Officer au Musée canadien de l’immigration du Quai 21. Mme Smith (ne vous fiez pas à son nom de famille) est un descendant de Federico et Mabli Artuso de San Martino di Lupari; elle a écrit une histoire sur sa vie de jeune italo-canadienne grandissant à Sault Ste. Marie, Ontario, paru dans Mamma Mia: Good Italian Girls Talk Back (ECW Press). L’objectif de Mme Smith de travailler au Musée, qui est d’aider à recueillir, préserver et faire connaître les souvenirs des immigrants qui sont venus au Canada, la motive également à contribuer au travail de l’ICAP.
 Sandra Parmegiani enseigne les études italiennes et européennes à l’Université de Guelph et a été présidente de la Société canadienne d’études italiennes (juin 2014 à juin 2017). Dans le passé, elle a enseigné la littérature et la langue italiennes au Trinity College de Dublin (Irlande) et à l’Université de Western Ontario. Ses recherches portent sur la littérature et la culture italiennes du XVIIIe siècle et de la période contemporaine. Depuis 2013, grâce à une bourse obtenue de Mitacs, elle encadre des travaux postdoctoraux sur la cartographie des ressources culturelles immatérielles par l’analyse de la culture de la lecture.
 Gabriel Niccoli est titulaire d’un doctorat. en littérature comparée de l’Université de la Colombie-Britannique et professeur émérite d’études médiévales et d’études françaises et italiennes à l’Université St. Jerome, affiliée à l’Université de Waterloo. Il y a dirigé le département pendant dix-sept ans et a reçu le Distinguished Professor Award. Il a publié de nombreux ouvrages sur la théorie dramatique italienne et française des XVIe et XVIIe siècles et sur les écrivaines italiennes de la Renaissance. Il a édité un volume intitulé Ricordi et publié des essais sur des études liées à l’immigration italo-canadienne. Il édite actuellement un recueil d’essais critiques sur le thème du nostos, ou du retour à la maison après un long voyage. Le professeur Niccoli a reçu des honneurs en Italie et au Canada et a été vice-consul honoraire d’Italie en Ontario. Il est très actif comme animateur et promoteur culturel au sein des communautés italo-canadiennes de la côte ouest et de l’Ontario.
 Nancy Marrelli est archiviste émérite à l’Université Concordia et archiviste du nouveau Centre d’archives de la Communauté italo-canadienne du Québec. Elle est co-éditrice de Vehicule Press, une maison d’édition montréalaise. Elle participe activement aux activités professionnelles d’archivage au Canada, aux États-Unis et à l’international; ses travaux et publications en français et en anglais portent sur le droit d’auteur, la conservation, le patrimoine du monde de la danse, divers aspects de l’histoire de Montréal et les archives audiovisuelles. Elle a animé de nombreux ateliers et conférences et anime actuellement une série de webinaires en français et en anglais sur le droit d’auteur pour le Conseil canadien des archives. Mme Marrelli travaille également dans les domaines de la création littéraire et de l’édition.
 Michael Iannozzi est diplômé de l’Université Western. Ses recherches portent sur la documentation linguistique, la sociolinguistique et la sensibilisation du public. Il s’intéresse particulièrement au dialecte anglais du sud-ouest de l’Ontario et aux dialectes italiens des communautés italiennes du Canada. M. Iannozzi travaille avec Caroline Di Cocco pour documenter les histoires de vie de la communauté italo-canadienne de Sarnia, notamment par la numérisation de vieilles photos et bandes, et pour concevoir un site Web pour promouvoir ces morceaux uniques d’histoire. du Canada, un projet soutenu par les archives de Sarnia-Lambton. M. Iannozzi s’identifie autant à un Canadien d’origine italienne qu’à un Canadien d’une petite ville. Ses grands-parents paternels, nés à Castelliri (Frosinone) ont immigré à Sarnia en 1960. Ses grands-parents maternels, agriculteurs depuis 62 ans, fêteront bientôt leur 70e anniversaire de mariage. C’est un honneur pour M. Iannozzi de documenter et de préserver les histoires des Italo-Canadiens.
 Antonella Fanella est née à Milan, en Italie, et a grandi à Calgary, en Alberta. Elle est titulaire d’un baccalauréat ès arts et d’une maîtrise ès arts en histoire de l’Université de Calgary. Pendant 25 ans, elle a été archiviste pour le Glenbow Museum et des établissements postsecondaires. Elle est actuellement consultante en archivistique spécialisée dans l’évaluation des archives, le développement des collections et la migration des documents électroniques. Mme Fanella a publié des ouvrages historiques, notamment With Heart and Soul: Calgary’s Italian Community et de nombreux articles.
 Cristina Caracchini est titulaire d’une maîtrise en littérature italienne de l’Université de Florence et d’un doctorat en littérature comparée de l’Université de Montréal. Elle est professeure agrégée de littérature italienne et comparée à l’Université Western Ontario (UWO) et vice-présidente de l’Association canadienne d’études italiennes (ACEI). Elle est l’auteur de Cognizione e discorso poetico (2009) et de plusieurs articles sur les écrivains italo-canadiens, et co-éditeur, avec Enrico Minardi, du volume Ilpensiero della poesia (2017). Avec des collègues du programme d’études italiennes, Mme Caracchini a organisé des événements communautaires parrainés par l’UWO et la communauté italo-canadienne à Londres, y compris la conférence nationale ICAP en 2016.

 Secretario
 Dr. Pietro Pirani is an Assistant Professor in the Department of Languages and
  Maria Stella Paola, a recent retiree with 35
 Co-Chair